Upload and publish data using the NOMAD API
In this tutorial, we interact with the NOMAD API using Python and the nomad-utility-workflows package, to programmatically perform the full workflow for uploading and publishing data. We work with example data files to create projects, inspect the generated entries, modify metadata, share the projects with collaborators, and publish them on the NOMAD test deployment. By the end of the tutorial, we will have reproduced the core project workflow available in the NOMAD GUI.
What you will learn
In this tutorial, you will learn how to:
- Authenticate with the NOMAD API using Python
- Create projects and upload raw research data to them programmatically
- Retrieve projects and their entries and inspect or edit their metadata
- Share projects with collaborators and manage access permissions
- Publish projects on the NOMAD test deployment
Before you begin
This tutorial assumes basic familiarity with Python and programmatic workflows.
Before starting, make sure you have the following:
-
NOMAD user account
In order to interact with the NOMAD API, a user account is required. You can create an account by following the steps described in the How-to guides > ... > Create a NOMAD account. -
Python environment
A Python 3.11 or newer environment with permission to install external packages.
The examples in this tutorial are designed to be run in a Jupyter notebook. -
Basic Python knowledge
You should be comfortable running Python code, installing packages, and working with notebooks. -
Example files available on your local machine
This tutorial uses provided example data files for:
Warning
The code snippets in this tutorial are designed to be run sequentially in a Jupyter notebook. Running code snippets out of order may lead to errors, e.g., due to missing imports, variables, or setup steps that were introduced earlier. For a smooth experience, it's suggested to follow the steps in order.
Environment setup
In this tutorial, we will use the NOMAD test deployment. Therefore, in all code examples, we will set url="test" when calling the helper functions. Later, you can switch to url="prod" or a custom NOMAD API URL if needed.
We assume you are working in a Python 3.11+ environment, preferably in a dedicated virtual environment for this tutorial.
Need help creating a project folder, Python environment, and Jupyter kernel?
This optional section shows how to create a project folder, set up a clean Python environment, and ensure that Jupyter uses the correct kernel for this tutorial.
1. Create a project folder
Open a terminal (or PowerShell on Windows) and run:
All files used in this tutorial (notebooks, ZIP files, and env.txt) should be placed in this folder.
2. Create a virtual Python environment
-
Linux / macOS:
-
Windows (PowerShell):
3. Activate the environment
-
Linux / macOS:
-
Windows (PowerShell):
Once activated, your terminal prompt should show (nomad-env).
4. Install Jupyter and required tools
5. Register the environment as a Jupyter kernel
This step ensures that Jupyter can use the Python environment created for this tutorial.
6. Start Jupyter
Open or create a notebook (.ipynb), then select the kernel:
Kernel → Change Kernel… → Python (nomad-env).
7. Verify the selected kernel
Run the following cell in your notebook:
The printed path should point to nomad-env. If not, re-select the kernel.
Install the plugin and helper packages:
!pip install --upgrade pip
!pip install "nomad-utility-workflows[vis]>=0.2.0"
!pip install python-dotenv
The nomad-utility-workflows provides high-level helpers for interacting with the NOMAD API and python-dotenv is used to load credentials from a local file, e.g., env.txt.
Create a file named env.txt in your project folder with the following content and save this file next to your notebook or script and keep it private (do not commit it to version control):
Before calling any helper functions, load env.txt so that the environment variables are visible to nomad-utility-workflows:
This makes NOMAD_USERNAME and NOMAD_PASSWORD available to the package via environment variables.
Warning
nomad-utility-workflows reads NOMAD_USERNAME and NOMAD_PASSWORD only once, when you first import it. If you change env.txt afterwards, restart the kernel and run the cells again from the top.
Now you can check which user you are authenticated as, and confirm that the credentials were loaded correctly using:
from nomad_utility_workflows.utils.users import who_am_i

me = who_am_i(url='test')
print('Authenticated as:', me.name)
print('Username:', me.username)
print('Email:', me.email)
Example notebook output
This call confirms which NOMAD account is being used.
Finally, define the addresses that the following snippets use:
from nomad_utility_workflows.utils import core

# API address of the NOMAD test deployment
core.NOMAD_TEST_URL = 'https://nomad-lab.eu/test/backend/api/v1'

# NOMAD GUI of the test deployment, for links to projects and entries
nomad_gui = 'https://nomad-lab.eu/test'
Using the production deployment
To work with your own data on the production deployment, use url='prod' instead of url='test' in all helper functions, set nomad_gui to https://nomad-lab.eu/prod/v1/gui/v2, and leave out the core.NOMAD_TEST_URL line. Publishing there is irreversible.
Create projects
Next, you create projects in NOMAD from the three example ZIP files.
The helper upload_files_to_nomad both creates a new project and uploads the given ZIP file to it in a single API call.
Projects and uploads
In the NOMAD GUI, you organize your data in projects. The NOMAD API and nomad-utility-workflows still use the term upload for a project: the API endpoints retain upload in their paths, helper functions such as upload_files_to_nomad and get_upload_by_id work on projects, and the upload_id they return identifies the project. You can find this ID as Project ID in the project's SETTINGS > General, and entries store it as upload_id in their metadata.
Warning
All projects in this tutorial must be created on the Test Deployment of NOMAD. The data there is not persistent and will be deleted occasionally, which ensures that you can safely test uploading and publishing without affecting public data.
When running code snippets, always make sure that the url parameter is set to test, i.e.,
url="test".
Upload miscellaneous files
As a first example, upload the miscellaneous files to the 'test' NOMAD instance:
import os
from nomad_utility_workflows.utils.uploads import (
    upload_files_to_nomad,
    get_upload_by_id,
)

misc_zip_path = os.path.abspath('miscellaneous_data.zip')
misc_upload_id = upload_files_to_nomad(filename=misc_zip_path, url='test')
In this code:
os.path.abspath("miscellaneous_data.zip")resolves the ZIP file to an absolute path.upload_files_to_nomad(...)creates a new project on the NOMAD test deployment, uploads the file to it, and returns the project'supload_id.
Let's now inspect the project and compare it with what we see in the GUI:
misc_upload = get_upload_by_id(upload_id=misc_upload_id, url='test')

print('Upload summary:')
print('----------------')
print('Upload ID:      ', misc_upload.upload_id)
print('Entries:        ', misc_upload.entries)
print('Published:      ', misc_upload.published)
print('Embargo:        ', misc_upload.with_embargo)
print('GUI URL:        ', f'{nomad_gui}/projects/{misc_upload.upload_id}')
Example notebook output
This code does the following:
get_upload_by_id(...)retrieves the project metadata as aNomadUploadobject.- The final
print(...)statements show a compact summary:upload_id,entries,published,with_embargo, and a link to the project in the NOMAD GUI.
Open the printed link to see the project you just created in the NOMAD GUI. Because the project was created without a name, the GUI shows unavailable as its name. You will name a project later, in Edit the project's metadata.
Upload computational data
You can repeat the same pattern for the DFT example (FHI-aims.zip) to create a separate project for simulated data and inspect its entries:
dft_zip_path = os.path.abspath('FHI-aims.zip')
dft_upload_id = upload_files_to_nomad(filename=dft_zip_path, url='test')

dft_upload = get_upload_by_id(upload_id=dft_upload_id, url='test')
print('GUI URL:', f'{nomad_gui}/projects/{dft_upload.upload_id}')
This snippet creates a new project for the DFT ZIP file and prints a direct GUI link where you can monitor its processing status.
To check whether entries were created, retrieve them, and print their IDs and URLs, you can type the following:
Processing happens in the background. Define this helper to wait up to ten minutes for it to finish; you can reuse it for the XPS upload and publication below.
import time


def wait_for_process(upload_id, url='test', timeout_in_sec=600):
    deadline = time.monotonic() + timeout_in_sec
    while time.monotonic() < deadline:
        upload = get_upload_by_id(upload_id=upload_id, url=url)
        if not upload.process_running:
            return upload
        time.sleep(5)
    raise TimeoutError(
        f'NOMAD did not finish processing within {timeout_in_sec} seconds.'
    )
from nomad_utility_workflows.utils.entries import get_entries_of_upload

wait_for_process(upload_id=dft_upload_id, url='test')

dft_entries = get_entries_of_upload(
    upload_id=dft_upload_id, url='test', with_authentication=True
)
for entry in dft_entries:
    print(
        entry.entry_id,
        f'{nomad_gui}/projects/{entry.upload_id}/entries/{entry.entry_id}',
    )
This snippet retrieves all the entries (here only one entry) created from the uploaded computations data and prints each entry’s ID together with its direct GUI URL.
Example notebook output
Warning
If wait_for_process times out, inspect the project in the GUI before retrying. Do not query entries while processing is ongoing because an empty result may be cached for up to three minutes.
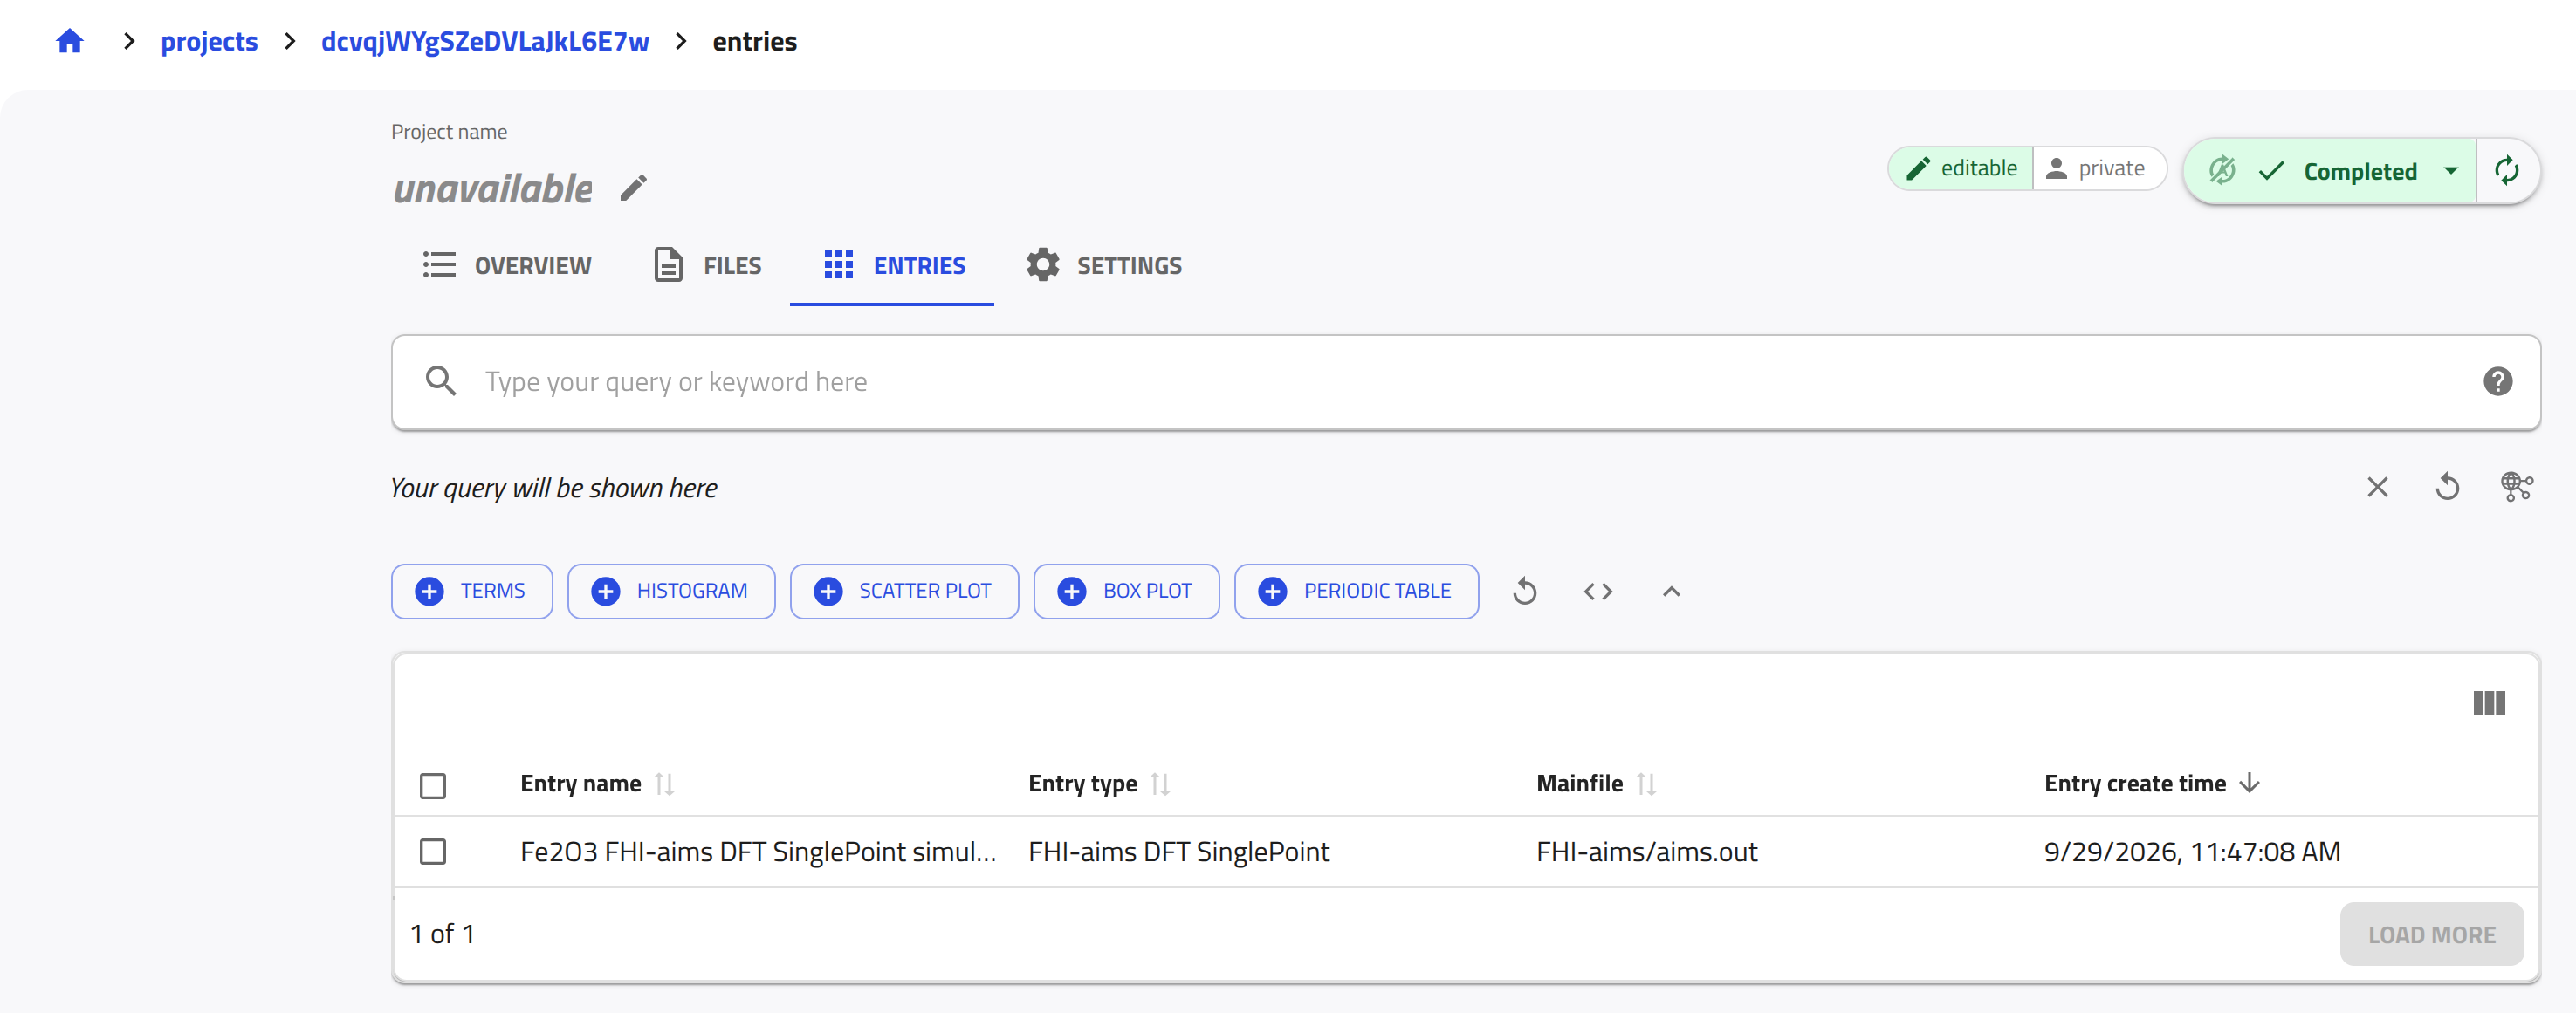
You can also inspect the same project in the NOMAD GUI using the link printed earlier. On the project page, the ENTRIES tab lists the entry created from the FHI-aims files.
Upload experimental data
The steps are similar to those you followed for the computations data.
Exercise: Upload XPS data and print the entry URL
Upload the file xps_nexus_data.zip to the NOMAD test deployment and print the GUI URL of the entry created in that project.
Solution
Here is a ready-to-paste snippet for your Jupyter notebook:
import os
from nomad_utility_workflows.utils.uploads import (
    upload_files_to_nomad,
    get_upload_by_id,
)
from nomad_utility_workflows.utils.entries import get_entries_of_upload

xps_zip_path = os.path.abspath('xps_nexus_data.zip')
xps_upload_id = upload_files_to_nomad(filename=xps_zip_path, url='test')

xps_upload = get_upload_by_id(xps_upload_id, url='test')
print('Upload GUI URL:', f'{nomad_gui}/projects/{xps_upload.upload_id}')

wait_for_process(upload_id=xps_upload_id, url='test')

xps_entries = get_entries_of_upload(
    upload_id=xps_upload_id, url='test', with_authentication=True
)
for entry in xps_entries:
    print(
        entry.entry_id,
        f'{nomad_gui}/projects/{entry.upload_id}/entries/{entry.entry_id}',
    )
Inspect a project
After creating a project, e.g., the DFT project, it is important to check whether NOMAD has finished processing it and whether any errors occurred.
dft_upload = get_upload_by_id(upload_id=dft_upload_id, url='test')

print('Upload status:')
print('--------------')
print('Upload ID:      ', dft_upload.upload_id)
print('Process status: ', dft_upload.process_status)
print('Errors:         ', dft_upload.errors)
print('Warnings:       ', dft_upload.warnings)
print('Entries:        ', dft_upload.entries)
print('Published:      ', dft_upload.published)
print('Open in GUI:    ', f'{nomad_gui}/projects/{dft_upload.upload_id}')
Example notebook output
This snippet:
- Retrieves the latest state of your DFT project from the NOMAD API, using
dft_upload_id - Shows the processing status and any errors or warnings.
- Tells you how many entries were created.
- Provides a direct link to inspect the project in the NOMAD GUI.
Once the project has been processed successfully, you can list all entries that were created from the uploaded files.
from nomad_utility_workflows.utils.entries import get_entries_of_upload

dft_entries = get_entries_of_upload(
    upload_id=dft_upload_id,
    url='test',
    with_authentication=True,
)

print(f'Found {len(dft_entries)} entries in the DFT upload:\n')
for entry in dft_entries:
    print(
        f'- entry_id: {entry.entry_id}\n'
        f'  name: {entry.entry_name}\n'
        f'  parser: {entry.parser_name}\n'
        f'  published: {entry.published}\n'
        f'  GUI URL: {nomad_gui}/projects/{entry.upload_id}/entries/{entry.entry_id}\n'
    )
Example notebook output
This code:
- Retrieves all entries belonging to the DFT project.
- Prints a compact summary for each entry, including ID, name, parser, and publication status.
- Provides a GUI link for each entry so you can open it directly in NOMAD.
Share and publish projects
After your project has been created and processed, you can modify its metadata to prepare it for sharing or publication.
In the examples below, we use dft_upload_id to refer to the DFT project, but the same pattern applies to any other project.
Edit the project's metadata
You can update the project's name as well as the entry-level metadata (such as comment and references) for all entries contained in the project. The function edit_upload_metadata applies metadata changes to every entry in the project.
from nomad_utility_workflows.utils.uploads import edit_upload_metadata, get_upload_by_id
from nomad_utility_workflows.utils.entries import get_entries_of_upload

metadata_update = {
    'upload_name': 'NOMAD Tutorial, Prepare DFT example for sharing using API',
    'comment': 'DFT upload created as part of the NOMAD API tutorial using nomad-utility-workflows.',
    'references': ['https://doi.org/xx.xxxx/example-doi'],
}

# Apply the metadata update
edit_upload_metadata(
    upload_id=dft_upload_id,
    url='test',
    upload_metadata=metadata_update,
    timeout_in_sec=60,
)
Example notebook output
{'upload_id': 'dcvqjWYgSZeDVLaJkL6E7w',
 'data': {'process_running': False,
  'current_process': '_edit_metadata',
  'process_status': 'SUCCESS',
  'last_status_message': 'Process completed successfully',
  'errors': [],
  'warnings': [],
  'complete_time': '2026-09-29T10:09:43.994000Z',
  'upload_id': 'dcvqjWYgSZeDVLaJkL6E7w',
  'upload_name': 'NOMAD Tutorial, Prepare DFT example for sharing using API',
  'upload_create_time': '2026-09-29T09:47:05.108000Z',
  'main_author': '00000000-0000-4000-8000-000000000001',
  'coauthors': [],
  'coauthor_groups': [],
  'reviewers': [],
  'reviewer_groups': [],
  'writers': ['00000000-0000-4000-8000-000000000001'],
  'writer_groups': [],
  'viewers': ['00000000-0000-4000-8000-000000000001'],
  'viewer_groups': [],
  'published': False,
  'published_to': [],
  'with_embargo': False,
  'embargo_length': 0,
  'license': 'CC BY 4.0',
  'entries': 1,
  'upload_files_server_path': '/nomad/test/fs/staging/d/dcvqjWYgSZeDVLaJkL6E7w'}}
This code updates the project name and applies the comment and references to all entries in the project. timeout_in_sec=60 lets the helper wait up to 60 seconds for the server's answer; the default of 10 seconds can be too short when NOMAD is busy.
Warning
Running the next snippet before NOMAD finishes processing the entries may make it look as if the entries metadata is not updated. Wait up to 3 minutes and retry to ensure the snippet is executed only after NOMAD processing has completed.
To inspect it programmatically try:
# Upload-level metadata (only the name appears here)
updated_upload = get_upload_by_id(dft_upload_id, url='test')
print('Upload name (upload-level):', updated_upload.upload_name)

# Entry-level metadata (comment and references live here)
entries = get_entries_of_upload(
    upload_id=dft_upload_id, url='test', with_authentication=True
)
for entry in entries:
    print('\nEntry ID:', entry.entry_id)
    print('Entry comment:', entry.comment)
    print('Entry references:', entry.references)
Example notebook output
Retrieving the entries again confirms that the metadata was updated correctly at the entry level.
In the GUI, the new project name is shown on the project page and under SETTINGS > General.
Share your project
If you wish, you can collaborate on this project by sharing it with selected NOMAD users of your choice. To do this, you first need to locate their NOMAD user account (their user_id). Once you have their user_id, you can assign them as a coauthor (write access) or a reviewer (read-only access).
Let’s start by searching for the user you want to share your project with. Replace SearchSurname in the snippet below with the name of that NOMAD user.
from nomad_utility_workflows.utils.users import search_users_by_name

candidates = search_users_by_name('SearchSurname', url='test')

for user in candidates:
    print(
        f"Found the user '{user.name}' (username '{user.username}') "
        f"with user_id='{user.user_id}'"
    )
Example notebook output
If several users have the same name, use the username to pick the right one.
Once the user appears in the output, copy their user_id. In the next step, paste this user_id into the appropriate list and comment out all lines related to the role you do not want to assign.
from nomad_utility_workflows.utils.uploads import edit_upload_metadata

coauthor_ids = ['paste-user-id-here']  # write access
reviewer_ids = ['paste-user-id-here']  # read-only access

edit_upload_metadata(
    upload_id=dft_upload_id,
    url='test',
    upload_metadata={
        'coauthors': coauthor_ids,  # comment out if not needed
        'reviewers': reviewer_ids,  # comment out if not needed
    },
    timeout_in_sec=60,
)

print('Access updated.')
If you wish, you can verify this on the project page under SETTINGS > Collaborators.
Set an embargo period
If you plan to publish your project to NOMAD but want to delay when it becomes visible to everyone, you can set an embargo period. The example below applies an embargo of three months.
edit_upload_metadata(
    upload_id=dft_upload_id,
    url='test',
    upload_metadata={'embargo_length': 3},
    timeout_in_sec=60,
)

upload_with_embargo = get_upload_by_id(dft_upload_id, url='test')
print('With embargo:', upload_with_embargo.with_embargo)
print('Embargo length:', upload_with_embargo.embargo_length)
Publish your project
You can now publish your project on the NOMAD test deployment:
Warning
Publishing data on the production server requires that you have the rights to the data and are eligible to release them under the CC BY 4.0 license, and this action is irreversible.
For this tutorial, we use the test deployment. Please make sure that url="test" is set before triggering any publication action.
from nomad_utility_workflows.utils.uploads import publish_upload
from pprint import pprint

response = publish_upload(upload_id=dft_upload_id, url='test', timeout_in_sec=60)
pprint(response)
Example notebook output
{'data': {'coauthor_groups': [],
          'coauthors': ['00000000-0000-4000-8000-000000000003'],
          'complete_time': '2026-09-29T11:18:29.488000Z',
          'current_process': '_publish_upload',
          'embargo_length': 3,
          'entries': 1,
          'errors': [],
          'last_status_message': 'Process completed successfully',
          'license': 'CC BY 4.0',
          'main_author': '00000000-0000-4000-8000-000000000001',
          'process_running': True,
          'process_status': 'PENDING',
          'published': False,
          'published_to': [],
          'reviewer_groups': [],
          'reviewers': [],
          'upload_create_time': '2026-09-29T09:47:05.108000Z',
          'upload_files_server_path': '/nomad/test/fs/staging/d/dcvqjWYgSZeDVLaJkL6E7w',
          'upload_id': 'dcvqjWYgSZeDVLaJkL6E7w',
          'upload_name': 'NOMAD Tutorial, Prepare DFT example for sharing '
                         'using API',
          'viewer_groups': [],
          'viewers': ['00000000-0000-4000-8000-000000000001',
                      '00000000-0000-4000-8000-000000000003'],
          'warnings': [],
          'with_embargo': True,
          'writer_groups': [],
          'writers': ['00000000-0000-4000-8000-000000000001',
                      '00000000-0000-4000-8000-000000000003']},
 'upload_id': 'dcvqjWYgSZeDVLaJkL6E7w'}
The response confirms that the publication request was accepted, not that publication succeeded. Publication runs asynchronously, so wait for it to finish and inspect its final status in a separate cell:
published_upload = wait_for_process(upload_id=dft_upload_id, url='test')
print('Process status:', published_upload.process_status)
print('Published:', published_upload.published)
print('Errors:', published_upload.errors)
print('Warnings:', published_upload.warnings)
Confirm that the process status is SUCCESS, Published is True, and Errors is empty; review any warnings as well. For details, see Inspect a project.